How to Lay Weed Mat: A Step-by-Step Guide for Beds, Rows and Pathways
Weed mat stops weeds by blocking sunlight, while rain and drip water still reach the roots. Laid well, it saves hours of hand weeding every season and lasts for years. Laid badly, it lifts in the wind, lets light in at the joins and weeds return within weeks. This guide shows you how to lay weed mat properly on beds, crop rows and pathways, step by step, with the right width, the right pins and the mistakes to avoid.
What you need
| Item | Recommended |
|---|---|
| Weed control mat | 110 GSM black, UV-stabilised woven mat, such as our weed mat rolls |
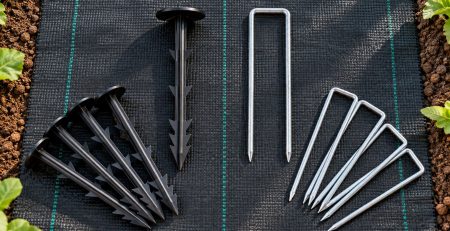
| Pins | 6 inch nails for firm soil, 7 inch nails for loose or sandy soil, or galvanized U-pins for joins and over drip pipe |
| Tools | Sharp scissors or a utility knife, measuring tape, rake, small hammer or mallet |
| Optional | Drip laterals and 16 mm drip pipe stakes if you irrigate by drip |
Choose the right width
Match the roll width to the area you cover so you cut less and have fewer joins. Add 10 to 15 cm each side so the edges can be pinned into firm soil.
| Roll | Covers | Best for |
|---|---|---|
| 0.6 m × 100 m | 60 sq m | Single crop rows, drip lines, nursery paths |
| 1 m × 100 m | 100 sq m | Raised beds, polyhouse aisles, kitchen gardens |
| 1.5 m × 100 m | 150 sq m | Wide beds, orchard rows, polyhouse floors, landscaping |
For a detailed comparison, including why wider rolls often cost less overall, see which weed mat roll width to buy.
How to lay weed mat, step by step
- Clear the ground. Remove existing weeds, roots and sharp stones. Weeds left under the mat can push it up, and stones can puncture it.
- Level the soil. Rake the surface smooth so the mat lies flat and water spreads evenly. Form beds now if you use them.
- Lay your drip lines first. If you use drip irrigation, place and fix the laterals before the mat goes down, then test them. See how to lay drip lines on raised beds.
- Roll out the mat. Unroll it along the bed or row. Use the green guide lines to keep it straight and pull it lightly tight.
- Overlap the joins. Where two pieces meet, overlap them by 10 to 15 cm so weeds cannot grow through the gap.
- Pin the edges. Fix a nail or U-pin every 1 to 1.5 m along the edges, and every 30 to 50 cm along joins and overlaps.
- Cut planting holes. Cut a small X where each plant goes, fold the flaps back, plant, then fold the flaps back around the stem. Keep holes small so light stays out.
- Finish the edges. On beds, tuck the edges into a shallow trench along the side and pin them, so wind cannot get under.

6 inch or 7 inch nails?
Use 6 inch nails in firm garden soil. Choose 7 inch nails for sandy, loose or freshly tilled soil and on open, windy sites where the mat could lift. Both have a wide flat cap that holds the mat without tearing it. Use galvanized U-pins where drip pipe runs under the mat, since they straddle 16 mm pipe without crushing it. Our weed mat nails vs U-pins guide compares them in detail.
How many pins do you need?
For a 100 m roll pinned on both edges every 1 m, plan on about 200 pins, plus extra for joins. On sheltered sites, pinning every 1.5 m brings that down to about 134. On windy or sloping sites, stay at 1 m or closer.
Special situations
Around trees
Cut a slit from the edge of the mat to the trunk, then cut a small opening around the trunk. Leave a small gap so the bark stays dry. More detail in weed mat for orchard rows.
Pathways
Lay the 0.6 m or 1 m roll along the path, pin every 1 m, and cover with gravel if you like the look. The mat stops weeds coming up through the gravel.
Polyhouse floors
Use the 1.5 m roll side by side with overlapped joins. See our polyhouse floor setup guide.
Slopes and windy sites
Run the mat across the slope where possible, use 7 inch nails or U-pins, and pin closer than usual.
Tips for a longer life
- Walk on the mat as little as possible when the soil underneath is wet.
- Check pins after strong wind or heavy rain and push back any that have lifted.
- Sweep off soil and leaves that collect on top, because weeds can root in that layer.
- At the end of a crop, lift, clean and roll the mat if you need to rework the bed. Our UV-stabilised 110 GSM mat is rated for 3 to 5 years outdoors.
Common mistakes
- Not clearing weeds first: tough weeds push the mat up.
- No overlap at joins: light gets through and weeds follow.
- Too few pins: one windy afternoon can lift an entire row.
- Big planting holes: weeds grow around the plant.
- Laying drip after the mat: always fix drip first.
Setting up beds for strawberries or vegetables? Our strawberry and vegetable bed guide covers mat and drip together. Need many rolls? Ask for a bulk quote.
Frequently asked questions
How do you lay weed mat?
Clear and level the ground, lay and test drip lines if used, roll out the mat, overlap joins by 10 to 15 cm, pin edges every 1 to 1.5 m and joins every 30 to 50 cm, then cut small X-shaped planting holes.
Will water pass through weed mat?
Yes. Our 110 GSM woven mat lets water and air through to the soil while blocking light.
Can I lay weed mat over grass?
It is better to cut or remove the grass first. Thick grass makes the surface uneven and can push the mat up at the edges.
How far apart should weed mat pins be?
Every 1 to 1.5 m along the edges and every 30 to 50 cm along joins and overlaps. Pin closer on windy or sloping sites.
Should drip irrigation go under or over weed mat?
Lay, fix and test the drip lines first, then roll the mat over them and cut holes at each dripper and plant.
How long does weed mat last?
Our UV-stabilised 110 GSM weed mat is rated for a 3 to 5 year outdoor life, depending on sun and foot traffic.